 Crunchy leaves, light sweaters, apple cider...I can practically taste the pumpkin cookies! It's officially fall, y'all, and your Faith, Fun & Fridays girls think you should host a party to celebrate the season! All four of our bloggers have worked together to create the recipe for a perfect fall-themed party for you and your friends, complete with decorations, snacks, a craft and games! Ready to get started?  DIY Decorative Dahlia - Written by Kaylie Hey, everyone! I don’t know about you, but Fall is one of my very favorite seasons. So, here’s a little step-by-step tutorial on how to make a paper dahlia that’s cheap and easy! If you have yellow, orange, or red paper, then you already have everything you need at home. Let’s do this!! Step 1. First things first; let’s get our supplies. You’re going to need: one or two sheets of Fall-colored paper of your choice, one white paper, protractor, scissors, black colored pencil, and tape. 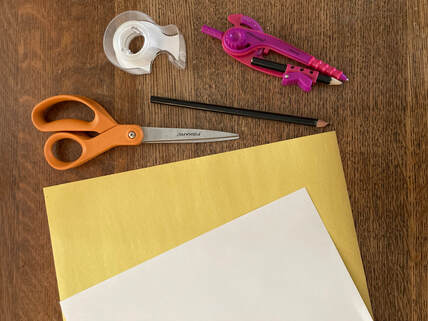 Step 2. Cut your yellow paper into squares, gradually making them smaller for the center of the dahlia. Using the protractor, draw a circle on your white paper and cut it out. Step 3. Alright, here’s the fun part! You’re going to make the petals by grabbing a big square and shaping it into a cone with a corner facing up. Tape it together. I found it was easier to shape when I wrapped it around my finger, so I hope this tip helps you too! Next, you’re going to tape that little cone to the circle. 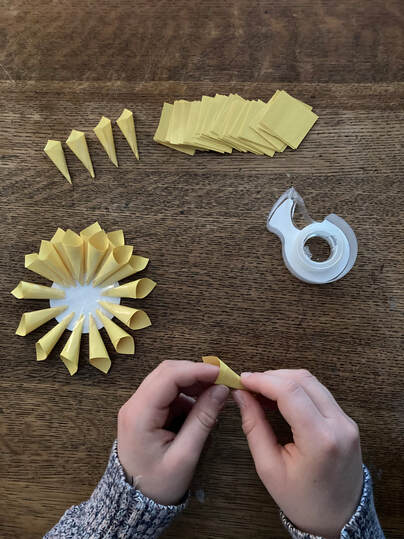 Step 4. When you come close to the center, start grabbing those small squares. Since it’s difficult to reach in to tape your petals in now, let’s make it a little more convenient. So get some tape and roll it into a tight circle so that the stickiness is facing out. Then, cut it up into tiny pieces and put it in of your flower. And then, stick your center petals on ‘till there’s no more room! 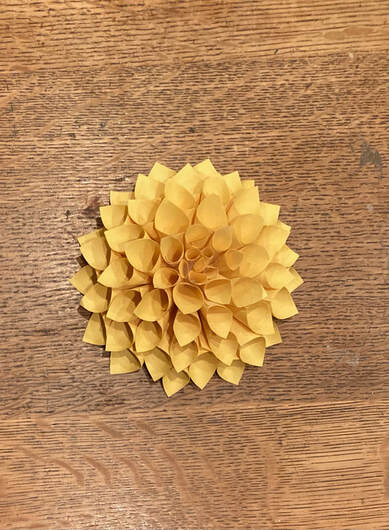 All that’s left is to take a look at your creation and savor your victory! (And decorate with it, of course… ;D) I hope you really enjoy your Fall party! -Kaylie  Tasty Treats - Written by G So you're planning a fall party? How fun! But your going to need appetizers to please your guests… but what to get? Pumpkin Pie: This fall treat never goes out of style. It is delicious and super fall-y! You can never go wrong with some classic pumpkin pie. There are recipes all over the internet on how to make it. Or you could just buy some at your local grocery store! Hot chocolate: This is more of a winter treat but if it’s cold out I say go ahead! You can buy a mix at the store and just heat some water and pour it in. Super good (and easy) if you ask me. Pumpkin Pudding: This treat is like pumpkin pie but in pudding form! It’s a very tasty and creamy treat! You can also find many recipes for it online. Caramel Apples: Everyone likes a good caramel apple. Mmmm…. It sure is messy! Just buy some green apples (or whatever apples you prefer) some kebab sticks (or popsickle sticks. They work too!) and caramel. Or you can make your own. Just melt the caramel and dip the apples in. It is such a good treat. I suggest sticking them in the fridge to let them cool and not drip all over the place! Fall Mix: Grab some pretzels, popcorn, nuts, and candy corn! This makes a great fall mix for everyone to enjoy. It’s simple, easy and really good! (Just make sure no one at your party is allergic to peanuts (or anything else) first) Cookies: Pumpkin cookies, chocolate cookies, sugar cookies, any cookies work! Punch: You can never go wrong with some classics punch in a bowl. This is also a Halloween drink and you can make it creepy by putting some edible eyeballs in it- ew! I’m sure there are much more treats you can easily make, but if you can’t think of anything I hope this list was useful! Have fun cooking! -G  DIY Phone Charm Craft - Written by Brooklyn Hello gals! Welcome to the craft portion of our Fall Party post. Today I am going to show you how to make one of the trendiest crafts around: a phone charm! You have probably already seen these cute, customizable strands of beads trending on Tik Tok, YouTube and Pinterest. They are super cute and a great way to add a fall touch to your phone, iPod or even a wallet. They are super easy to make and a great to do at a party because they require little prep and little clean up. Let’s get started! Prep time: 30 minutes Make time: 20 minutes Dry time: 1 hour (depending) Supplies you will need: • Durable string (preferably not too stretchy) • Super glue • Pony beads (fall colors) • Clip boards (one for each guest) • Scissors Before the party: 1. Before your guests arrive, set up your crafting station. Pour your beads into multiple bowls and set them around on your working table. Make sure each bowl has a mix of fall color pony beads. You could even have a separate bowl of metallic or glittery fall beads to add variety. 2. Whenever I make a phone charm I use a simple method to determine the length my string should be. Take the length you want your phone charm to be, double it then add about 5 inches onto that. That way, whether your guests want their phone charms to be a single strand (like my example) or a loop you have plenty of string to make a loop on one end, bead it, then tie the other end. Using my string method, cut a length of string for each guest. 3. Fold each piece of string in half and tie a loop on the folded end. 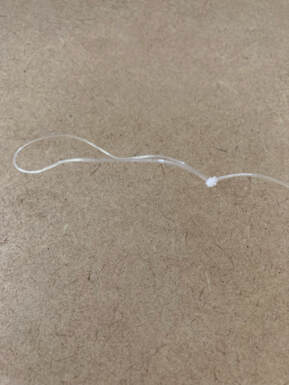 4. After you’ve tied a loop in each string, attach each one to a clipboard. This will keep the string secure while your guests bead them. 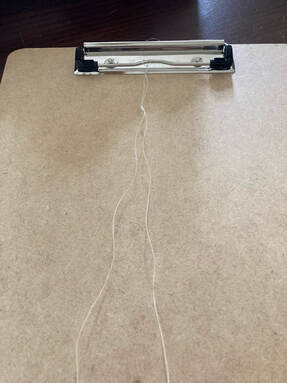 5. Place a string on a clipboard at each guest’s seat. 6. Set some super glue bottles and a few scissors on the table and your set up is complete! At the party: 1. Give your guests a few minutes to figure out their bead design. As soon as each guest decides what they want their phone charm to look like she can start stringing her beads onto her string. The classic phone charm is made by putting beads on both ends of the string, then tying the ends to form a beaded loop. For mine, I made it a single strand by putting both ends through each bead as shown in the pictures. Leave a couple inches of string unbeaded on the ends. 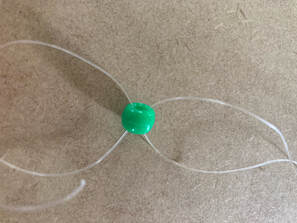 2. However each guest made their charm, instruct them in tying a knot to keep the beads from falling off. Have your guests apply glue to their knots so they hold really well. DO NOT skip the glue (I speak from experience). Continue on with your party and come back in an hour to see if the glue is dry. 3. Once your glue is dry, you can cut off the extra string on the ends and your guests can take their phone charms off their clipboards. All done! 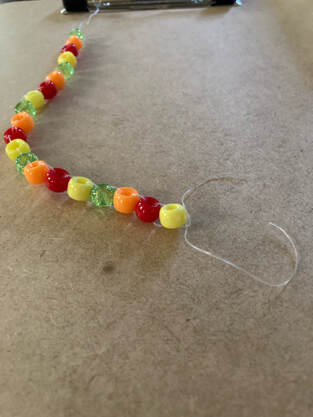 I hope you have fun making this craft with your friends. If you tried it I would love to hear from you! You can comment on this post or email us at [email protected] to tell us how it went. - Brooklyn Game Time - Written by Abbie 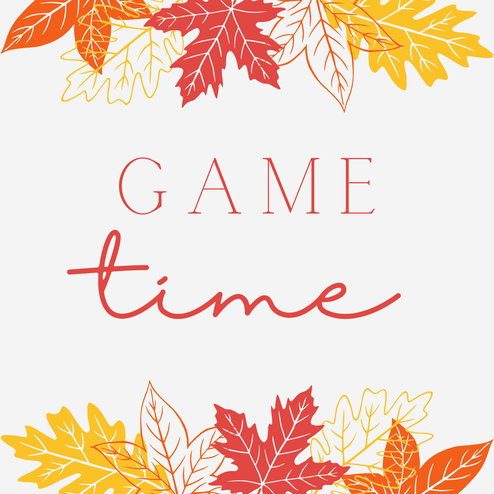 So, you've decorated your space in preparation for your party, made (and eaten) lots of delicious treats, and even completed a super fun craft. The only thing that's missing? A few fun, minimal set-up games for your guests to play!
Tumble the cup stack: For this game, you'll need 5-10 big plastic cups (orange preferred!) and a round miniature pumpkin. Find an open spot on the floor, and stack the cups up into a pyramid. Then, take turns rolling (not throwing!) the pumpkin at the pyramid to try to tumble it. The girl who knocks down the entire cup pyramid with the lowest number of tries wins an extra dessert. Apple stacking: Have all the guests sit at a table, and set a large bowl of apples in the middle of the table. Start a one minute timer, and challenge the girls to see who can create the largest tower of apples by stacking them. Tower must be standing at the end of the timer. Fall Bingo - Yep. Bingo's basic, but somehow, it nevers goes out of style. Print out a fall bingo board from the internet, or make your own using Canva or Microsoft Publisher. Then add some fun prizes and use candy corn or mini plastic pumpkins as bingo markers for the simplest game ever. Scarecrow Contest - Divide the guests into groups of 3, and give them farming hats and clothing, supplies to make a scarecrow mask, and challenge them to dress up one of their team members as a scarecrow. The team who finishes first, with a plausible scarecrow, wins! __________________ We hope you had fun creating a fall party! With Love, A, B, G & K
0 Comments
6/26/2021 0 Comments HOst A summer party If you read my last post about hosting your own summer decathlon and want another summer activity to do here’s another one. Host a summer party! I have listed a few things we did a couple of years ago and things we still do with our families and friends today! I had a lot of fun making this post and hope you have a good time reading it!! Here’s a look at my summer in past years.
Food: Whenever we have a summer party, we usually grill cheeseburgers, brats and hotdogs, and we make sure we buy all the fixins. We also make big chef salads, fruit salads and other delicous salads. We usually have sweet tea, lemonade, or some other refreshing beverage. People bring delicous cakes and pies. Sometimes we’ll make homemade ice cream and impatiently wait listening to the maker churn and crunch the ice. (Then the dog usually comes up and licks up all the slushy water.) :) We eat out on the deck and (as my family has said in the past…) eat until we are as full as ticks! Activities: We usually swim in our pool, walk down the long lane beside our house or walk in the VERY nearby state park with our dog. We also bring our outdoor mouser cats up to the house and play with them, pet them, make toys out of yarn for them and much more! One time, we played all sorts of games like keep-the-egg-on-your-spoon (Except we used golf balls instead of eggs which was a good thing because I was much, much younger then and so were the rest of my cousins.) We got prizes if we did well enough. If I was asked if I could do that party again today, I would say yes in a heartbeat!! Sometimes we just sit on our deck or porch and listen to our grandparents talk about the good old days. I find it very enjoyable. Then when it gets dark, we plug in the bug lights, light sparklers, set off fireworks, and “pop pop-rocks.” Grandpa lights the firecrackers to scare the moms talking on the front porch. Oh, don’t even get me started on the Roman candles. What fun we have! Feel free to leave a comment below so I can see what you think of this post!!! I hope you now have some ideas for your own summer party and I hope you too, have tons of fun! Yours truly, Elizabeth 4/23/2021 4 Comments How to make a no-sew scrunchieSeems impossible, huh? I know right! How can you make a scrunchie without sewing? Well, this is actually really easy, simple, and cute! I mean just look at them! So pretty! Scroll down to find out how to make one of these cuties! Supplies you will need:
1. Cut a strand of fabric around 4 inches wide and 18 inches long. If you want a bigger scrunchie, make the fabric wider.  2. Fold the fabric and align the piece. Hot glue the end to have them stick together. The plain side should be facing up and the designed side should be facing down. 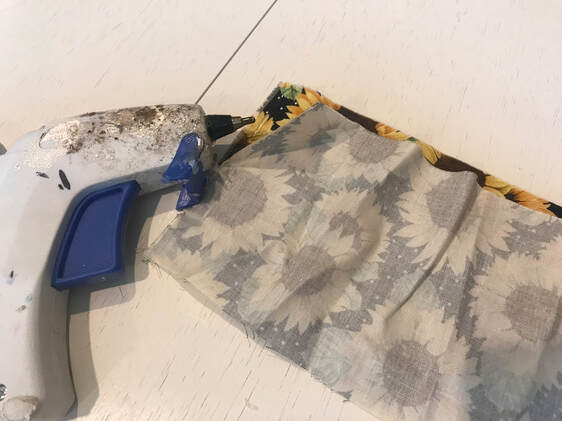 3. Take the round object and wrap the fabric around it, the design part facing the cup. Wrap the ponytail around the fabric and cup, so it looks like this: 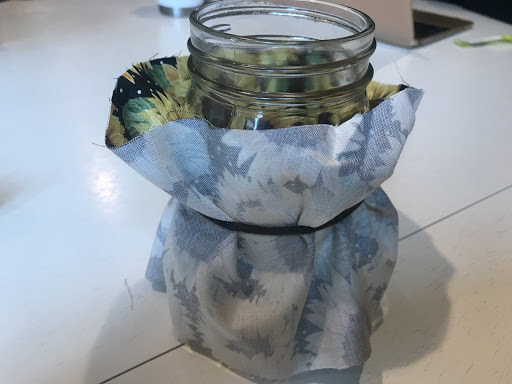 4. Fold the ends like so: 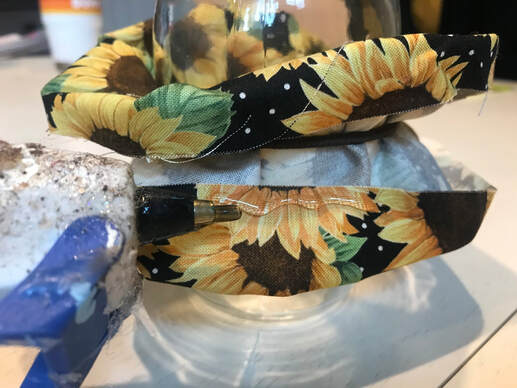 5. Glue the bottom side and fold them together like this (Be sure to press together firmly for a couple of seconds so it stays) 6. Repeat around the whole cup until finished. Take off the scrunchie and wear it around! Then boom, done! Love, Bailey 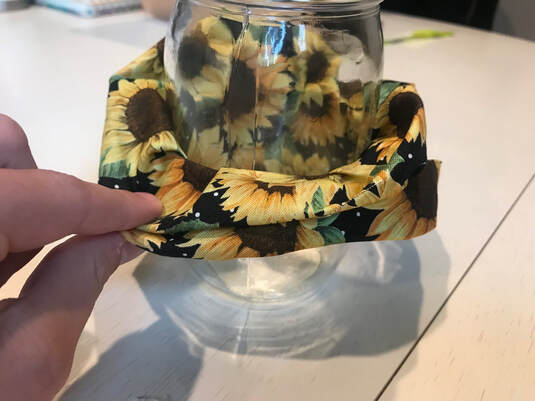 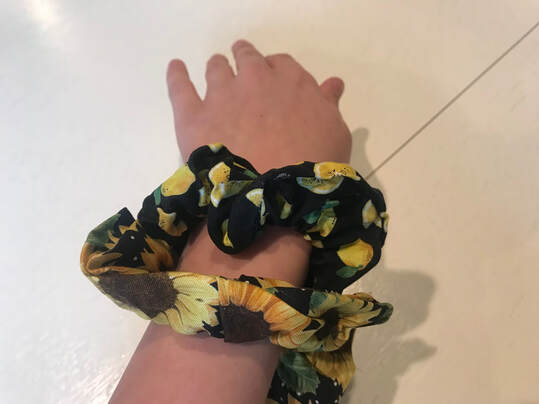 4/16/2021 2 Comments Create your own summer decathlon Are you looking ahead at this approaching summer and seeing nothing scheduled on your calendar? Are you not scheduling anything because really, you have no idea what to do? Well not to worry, a summer decathlon is the perfect way to either get your summer started, or be the main focal point of your summer vacation! Get in some exercise, create an enjoyable event for your family and/or friends, and most importantly, have some fun!!! The way it works is you pick 10 of the following activities, make them your own, and then get your party-racing face on! Oh, and don’t forget to START your ENGINES!!!
#1 Bicycling: Race your friends/family around at safe speeds circling your home, racing down your driveway, bikepath, etc. #2 Jump rope challenge: Be the first one to jump rope successfully 25 times. #3 Hula hoop challenge: Loop that hula hoop about you 30 times, or if you have enough hula hoops, make a tire jump and go through the course once. #4 Monkey bar challenge: Grab on to your monkey bars, pull yourself up, and then hold for 25 seconds! You could also use 5lb kettle bells and hold them for the same amount of time! #5 Swimming challenge: Get your one piece (or modest two piece ) on and do two laps around the pool! #6 Corn hole challenge: Be the first one to get 5 corn bags through the hole! #7 Horse shoe challenge: Try getting 5 Horse shoes wrapped around the pole. (One may notice that this is kind of like the corn hole challenge). #8 Hop scotch challenge: Make 30 squares, and go forward to backward twice. (If you want to, make more than one hop scotch course, so if the contestants get there at the same time they don’t have to wait!) #9 Shoot through the hoop: Make 5 baskets through a basketball hoop! #10 Sack race: Race 20 ft in your sack to the finish line. #11 Putt-putt course: Set up a putt-putt course by gathering random items from around your home! Get things that a golf ball could go through, around, and of course, not break! Get through the course at least once. (You could also do the same with croquet or really any random ball.) #12 Running challenge: Run a 15 ft sprint to the finish line to claim your big win! I hope you enjoyed your decathlon! If you know me, then you’ll also know I love a good challenge! I really do hope that you have TONS of fun!!!!! Feel free to ask me questions or give me advice on how to make my posts even better! This is my first time writing on “Faith, Fun and Fridays” or any blog for that matter, so I would REALLY like to hear back from you! Thanks for reading, racer! Sincerely, Elizabeth 4/9/2021 1 Comment Get Growing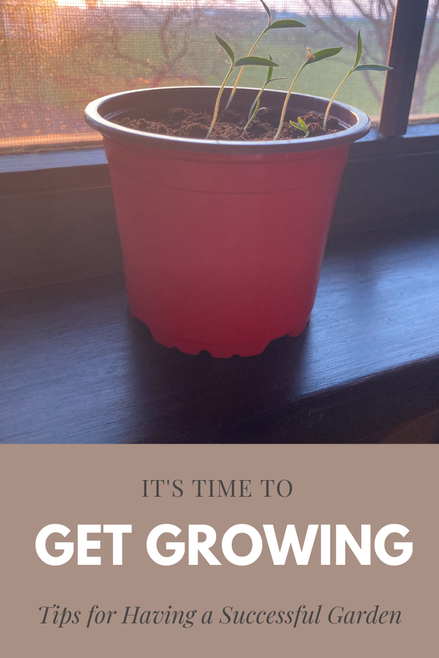 Spring is here and it’s time to get growing! I can’t wait to share some awesome gardening tips and tricks with you, but before I begin I just want to say that it’s GREAT to be back. Abbie and I really missed blogging but I think that you will find that we were still busy with the blog even though we weren’t posting anything new. If you don’t get our email newsletter, you may not have heard the awesome news. If you would like to find out what’s new, take a peek around the blog (there might be something on the Meet Us page) and come back every Friday and Monday in April to see the latest changes. So with that said, roll up your sleeves because it’s time to get growing! Choosing your plant: This first step, right here, is where most newbie gardeners go extremely wrong. It’s where you could make it or break it, so don’t skip this section! Picking the right plant for you is way more important than it sounds. You don’t want to pick a plant that requires too much of a time commitment and then it gets unhealthy. You also might want to consider what you want to GET from a plant. Do you want something that will produce veggies? Purify your air? Grow up a post? Make your room smell good? Plants don’t just have to be about caring for something. They can care for you too. Choosing your pot: This is another step that seems unimportant, but is actually very vital. Take a look at your chosen plant. If it came in a good ceramic or hard plastic pot, you shouldn’t need to do anything with it. But if your plant came in a flimsy plastic container (or no pot at all if you are starting from seeds) then you will definitely need a better pot once the plant grows for a couple weeks. Be sure to choose a small pot to start with. You don’t want the moisture to go down to the bottom of a large pot where young plant roots can’t reach. You can always replant the plant in a larger pot as it grows. You could even try pulling seeds in ice cube trays to start them off. Growing do’s and don’ts:
So after you are all set up with your plant, pot and dirt, now what? Below I have a list of plant do’s to help you with your growing needs. Do’s: • Do keep young plants and seedlings inside your house for now. They can’t handle rough weather yet. When there’s no chance of morning frost or snow it should be ok. If you see that there is a high wind advisory in your area and your plant’s stem is thinner than a straw, pull them in temporarily. • Do check your plant’s dirt each week. Touch the dirt and then look at your finger. If dirt sticks to your finger then the dirt is moist enough. If it falls off and/or feels like sand then your plant needs water. • Do weed your plants every time you see a weed. If you wait until there are multiple weeds then by that point the first few weeds will have grown much stronger. • Do give your ivy and tomato plants something to grow on. Metal wires or posts are a good choice. If they have nothing to grow on they will drop to the ground and grow on that. Don’ts: • Don’t forget to give your plant lots of sun. Check on the internet for how much sun your plant needs each day and be sure to give it approximately that amount. • Don’t give your plant too much water. It is very possible to drown a plant, so watch the dirt closely as you water it. If you see that the dirt is not rapidly absorbing the water as you pour it then stop watering immediately and feel the dirt. Touch the dirt in a spot where you didn’t water it and note the consistency. If it feels wet, then your plant is watered enough. If it feels dry and dusty, then it’s probably too packed to absorb the water quickly. Use a fork to gently fluff the soil but be careful to not snag or pull up the roots. • Don’t forget to add something to the pot to absorb extra liquid. This can be anything from a tray or towel under a small pot, or a layer of fist size rocks in the bottom of a large pot. • Don’t put plants together that don’t like each other. If you plan on putting several small plants together in a large pot, be sure that those plants work well together. Look it up online or ask the greenery you are buying from for suggestions on compatible plants. I hope this posts answered all of your basic gardening questions. If you have any questions or maybe a gardening tip of your own, put it in the comments below. -Brooklyn 2/12/2021 0 Comments DIY Love Magnet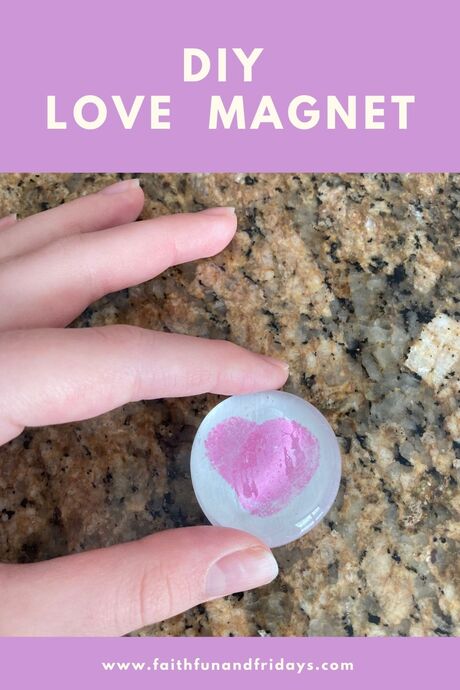 Quick disclaimer: I found this craft idea on Pinterest and I’m not trying to copycat, I just wanted to give it a try. Aren’t these SO CUTE!!!! I bet you clicked on this post just because of this cute picture. I mean, really, isn’t that the cutest Valentine magnet you’ve ever seen? It’s actually the only one I’ve ever seen, but I still love it! With Valentines Day rolling around I thought this would be a super fun craft to make to give to family and friends. It’s quick, easy, and (as previous stated) adorable! Check out my directions below and give it a try. Supplies you will need: • Stick on magnet • Smashed glass marble thingy (someone please help me come up with a better name) • Foam brush • Mod Podge or sealer • Card stock paper • Scissors • Stamp ink pad • Wax paper 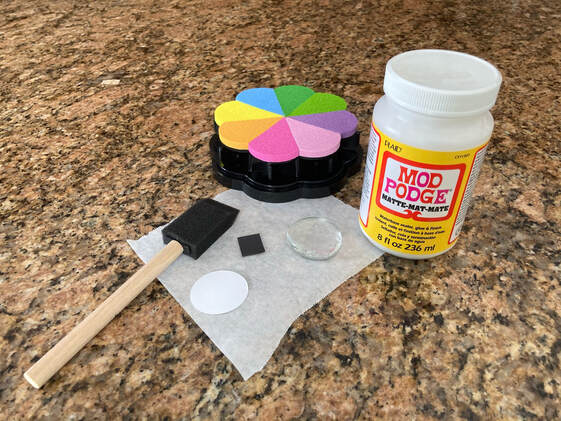 1. Trace your glass thing (seriously, comment below with a better name) on your card stock. Cut out the shape and put it aside. 2. Gather all your supplies and lay wax paper over your work space to protect it from ink and sealer. 3. Press your thumb firmly into the ink pad and press your thumb on the paper circle. Turn the paper slightly and repeat. This will make the heart. 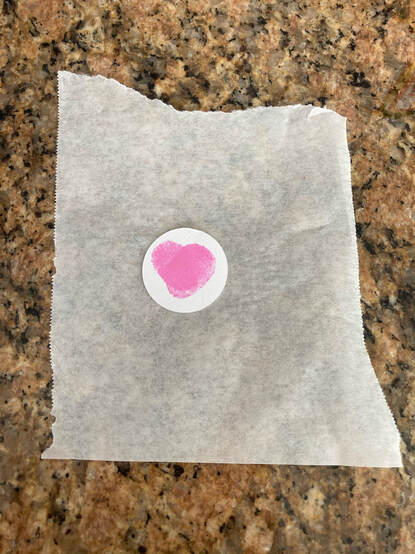 4. Use your foam brush to put a thin layer of Mod Podge or sealer on the back of your glass piece. If you don’t have sealer you can mix glue and water together to create an equivalent. Put the glass on top of your paper circle with the heart. It might look foggy at first but it will clear as it dries.  5. Once it is dry, attach the sticky magnet and ta da!! All done!
-B  Just because 2020 and 2021 are strange years doesn’t mean that you have to stop having fun! One thing that many girls have been missing due to COVID is sleepovers, so B, our friend E and I had a super fun virtual sleepover a few weeks ago! We did lots of regular sleepover activities, but just adapted them a bit to make them work on a video call. Here are some tips and tricks for a virtual sleepover!
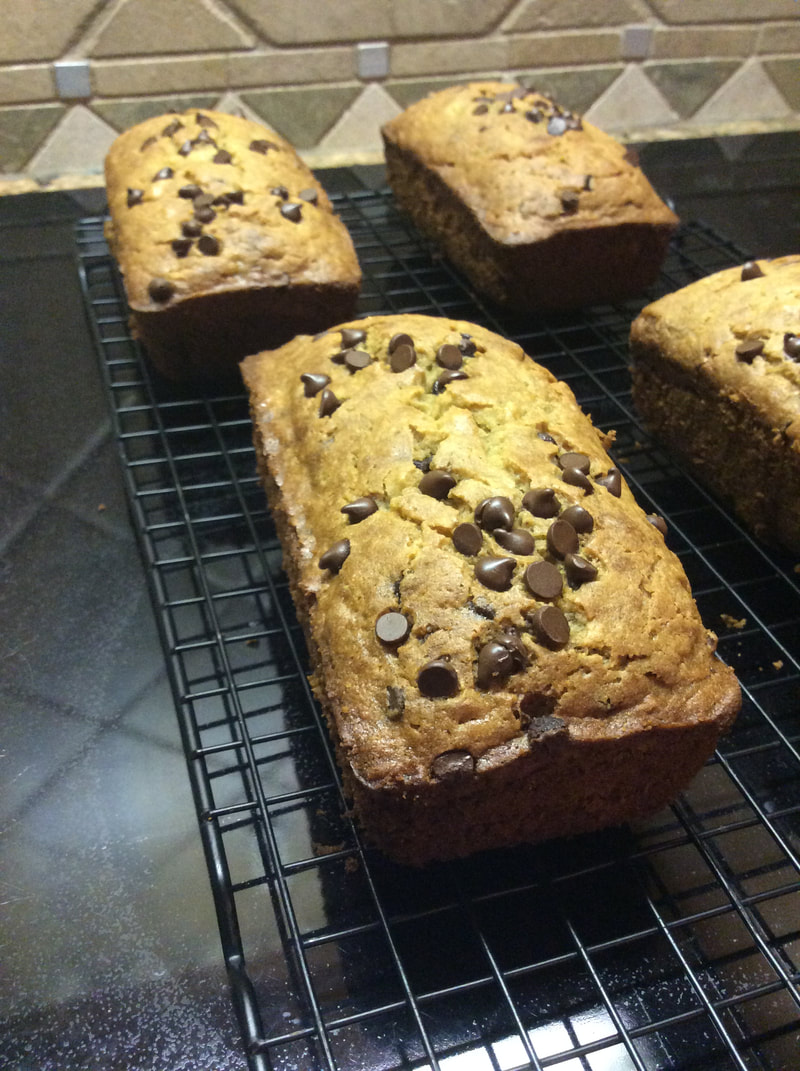
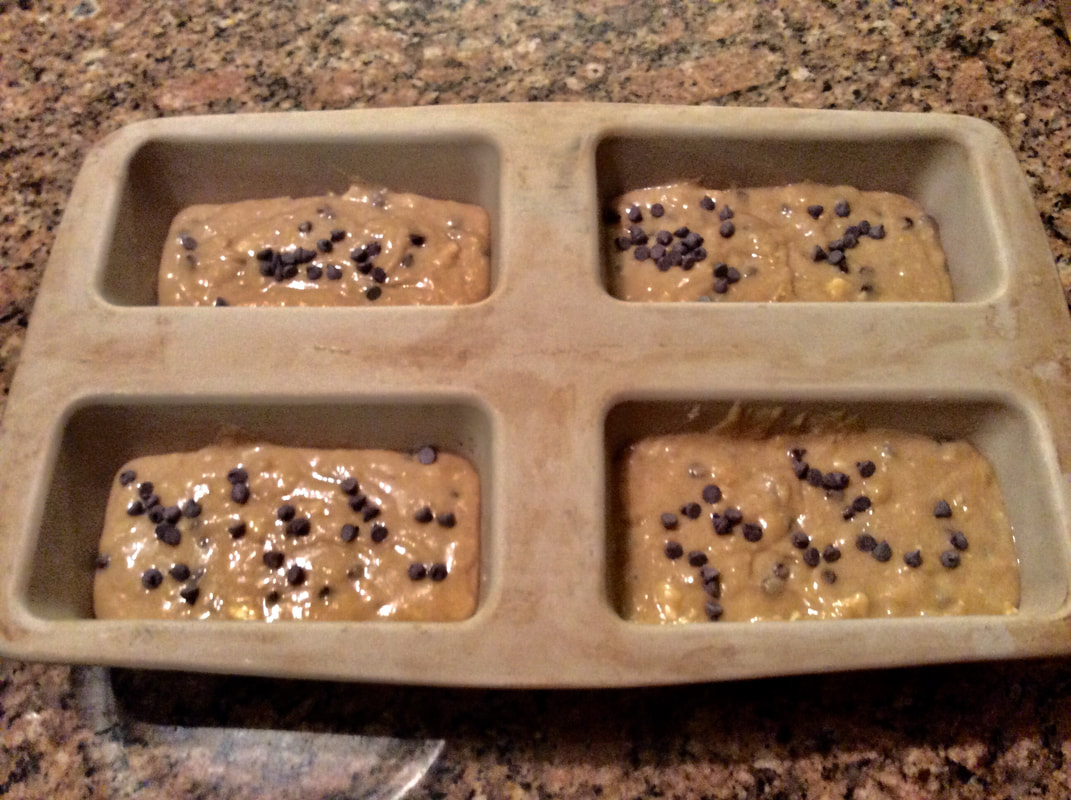
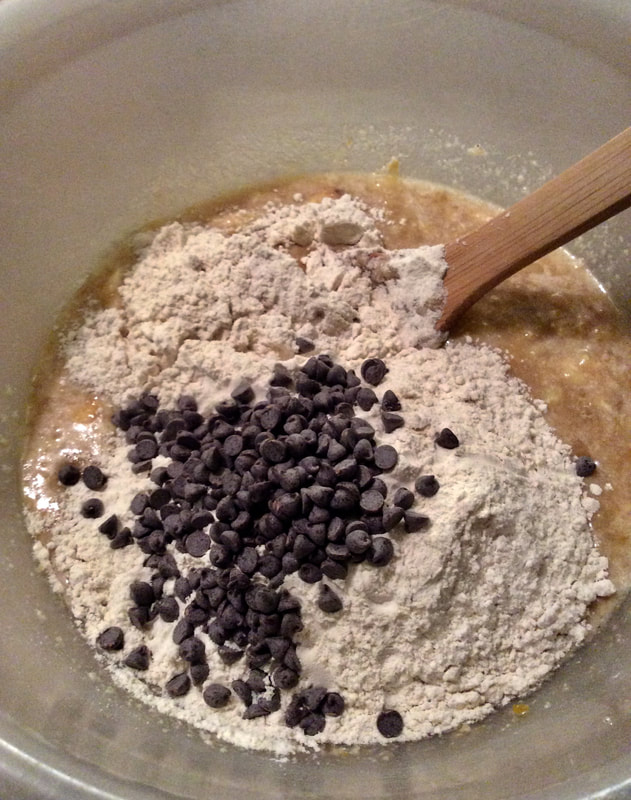
Plan the Basics Start by finding a date that works for all of your guests (2-5 guests is ideal). Then, figure out what time you’ll start and stop. My friends and I started our virtual sleepover (we called it a Skypeover, since we used Skype) at 5:00 and went until about 10:00. Then, we resumed the next morning from 8:45-11:00. Also, figure out whether you all will eat dinner and breakfast on the video call together, or before it. Plan the Fun Pick lots of activities to do! At our sleepover, we ate dinner, made slime, went on an around-the-house scavenger hunt, made cake in a mug, played mad libs, had a lego building war, played other games and took silly selfies (ok, maybe they were more like screenshots). You could also do crafts, paint your nails or watch a movie together! Try searching ‘virtual games” for more ideas. You can have a few video calls before the night of the sleepover to coordinate the details. Try splitting up the preparation and planning tasks between girls, so each person plans and leads one or two activities. Have the Sleepover Show up, bring giggles and have tons of fun! I hope that you and your besties have an absolutely awesome virtual sleepover. Just because you can’t get together in person doesn’t mean that the fun has to end! Love, A 1/15/2021 0 Comments Something Sweet to eat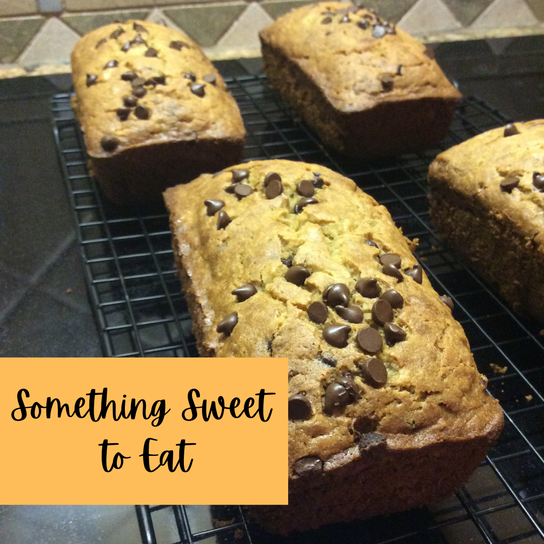 Christmas is gone and it shows. The tree is down, the light displays are gone, and there are no longer Christmas songs on every radio channel. That makes me sad but there is something that makes me even sadder...... no more Christmas treats! Our house has been cookieless for 2 weeks now and my sweet tooth has started begging. I didn’t want to go through the trouble of making dozens of cookies again, but I decided to take some of the baking supplies we had left over from the holidays to make something yummy. Thankfully I remembered that my mom has a delicious chocolate chip banana bread recipe that uses pretty basic ingredients. I got started and had the bread made in no time! Ask one of your parents for one of their favorite sweet recipes or try something new! Let us know what you made by putting it in the comments. -B P.S.Can find anything yummy to make? Find us on Pinterest where we have a whole board about healthy and delicious snacks! P.P.S. Below I have some photos of how my banana bread turned out! 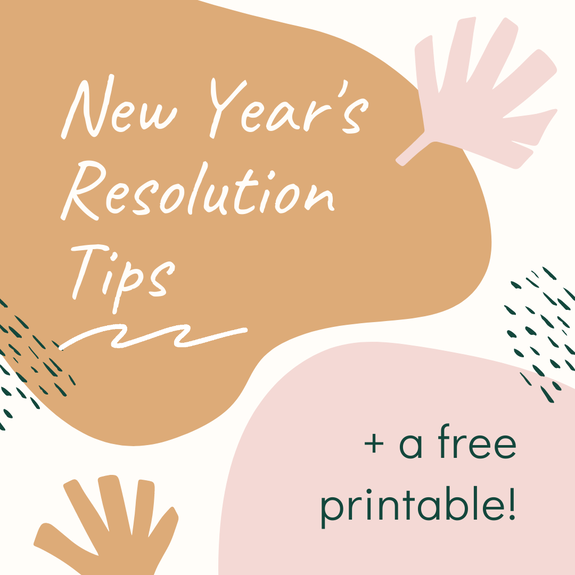 It's the NEW YEAR, which means that you may be thinking about New Year's Resolutions. It’s super easy to set fantastic goals in January, such as exercising more, eating less sugar, drinking more water, reading your Bible more or getting more sleep, but these goals often don’t last long. Today, I’ll be sharing some of my favorite tips to help you create New Year’s goals for your physical and spiritual health that will last past January 6! Tip #1. Make it Simple. Set one - ONE - main goal. If you are trying to tackle ten goals or new habits at once, you will soon run out of patience, energy and willpower. Zero your efforts in on a small number of goals that you are passionate about for best efforts! You could also set a single goal in each of a few categories: for example, one education, one health and one Spiritual goal. Tip #2. Make it Specific. Don’t make a goal that says ‘drink more water.’ Do make a goal that says ‘drink one glass of water after breakfast every day.’ Make sure to establish the following details about your goals (I’ve answered the prompts about my hydration example in parentheses). Figure out when (every morning after breakfast), where (in the kitchen) and how often (daily) you will fulfill this goal, what success is (drinking one glass of water) and why this goal matters to you (because I have noticed I am dehydrated and I want to fix it). This might sound like a lot of work, but it can really help you follow-through in the long run! Tip #3. Make it Visual. Print out this printable and fill in the two blanks. Then, hang it up somewhere you will see it daily! I’ve also added spots for you to cross off the first 14 times you follow through on this new goal (because crossing things off is often motivating!). I hope this printable will remind and encourage you to set and follow through on your goals in 2021!! Click the button below this image to open the document in a new tab on your device, where you may print or download it. 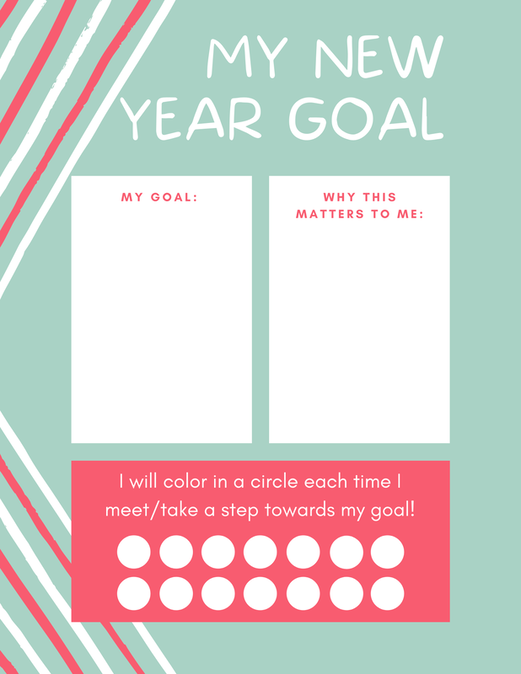
What is your goal for this year? Tell us in the comments!
Love, A 12/18/2020 0 Comments Diy Christmas CardsChristmas is coming extremely soon and I hope you have already sent your Christmas cards, but if you haven’t or you need the perfect card to attach to a last minute present, then what better way to say Merry Christmas than a homemade card? All my ideas take very little effort and will make someone’s day! Clear off a space on your table and I will help you along the rest of the way. Supplies you need: * Blank cards (white, colored, or patterned) * Envelopes (should come with cards) * Card stock paper * Glue dots * Die cuts or a Cricut maker * Double sided tape * Pens * Washi tape 1. Pick out the blank card that you want to use. Then pick out the die cuts that you want to put on it. If you don’t have already made die cuts then you can use a Cricut or by drawing on cardstock and cutting out pictures. I recommend making some flowers, Christmas trees, presents, and ornaments out of paper. 2. Use double sided tape or glue dots (depending on the die cut size) and attach them to the card. Write any words you want on the card and in the card. Put the card in an envelope and address or label the envelope. Lick the seal to seal it shut, then put some cute washi tape on the outside over the seal. All done! Isn’t Christmas card making fun? I excluded pictures of cards I made below. -B 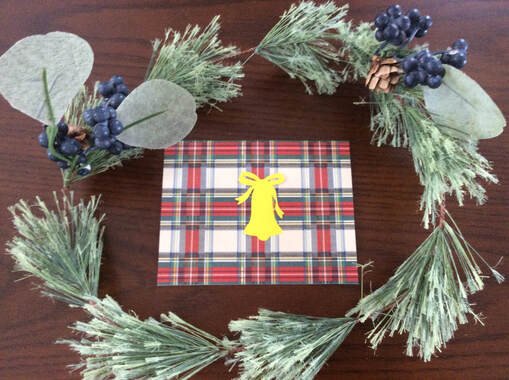 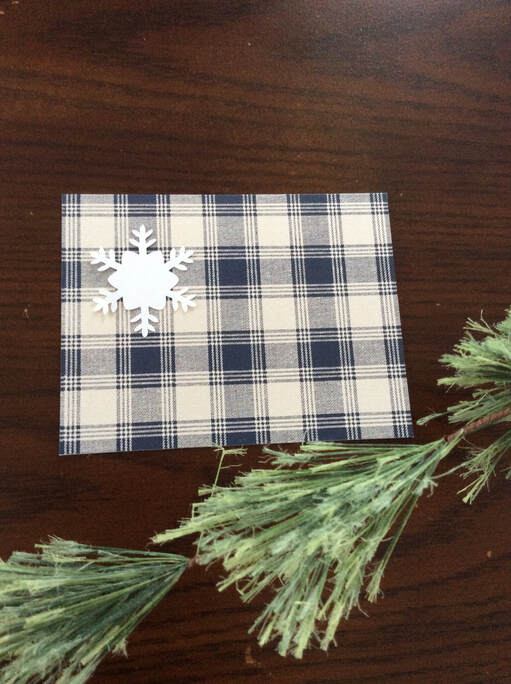 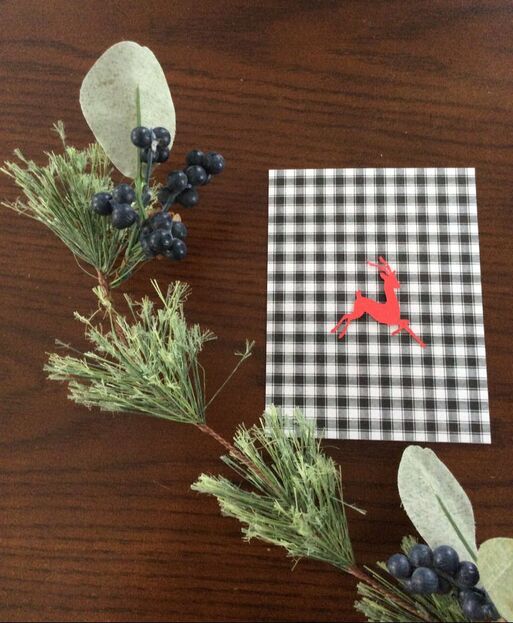 |
|||
Search by typing & pressing enter