
|
5/14/2020 1 Comment 13 ways to rest in everyday lifeB and I have written lots of posts on how to fill up time, to put it bluntly. From books to read to things to do to videos to watch, we've got dozens of ideas to help you stay busy. But what if that is not what you need today? What if what you really need is solutions to help you breathe, relax, and care for yourself in the middle of your busyness? That's what today's post is all about. Here are creative ideas and unique solutions to help you find rest and peace in everyday life. Whether you want to be better at taking care of yourself, are looking for tips to help you avoid becoming stressed, or need tools to help you cope with the chaos, I hope that you will find good ideas in this list! 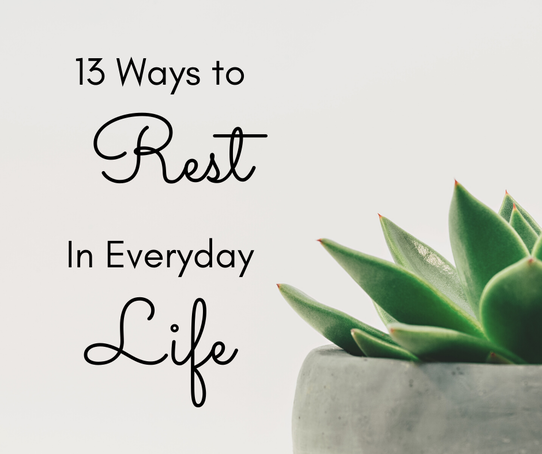 1. Make Time When you decide to add something to your routine, actually commit to doing it, and establish when, where, and for how long you will do that thing. Then, give yourself some accountability. You could leave a reminder on your mirror, add it to your to-do list, create a notification in your phone, or ask a friend to keep you accountable. If you don't make time, commit, and come up with a way to remind yourself and stay on track, then your good intentions won't matter and you probably won't make any progress. 2. Drink Water Staying hydrated is literally essential for life. However, dehydration can contribute to tiredness. Be kind to your body and grab an extra glass of ice-cold water - fresh fruit infusion optional. :)  3. Step-Up Your Selfcare Try doing one thing every day to take care of your body. Maybe it's a 1-minute hand massage, putting on some lip balm, or cleansing your face. Whatever you choose to do with your one minute, nurturing your body is relaxing and can help you feel prepared to face the day (or help you unwind after a difficult day). 4. Use a To-Do List Did you know that trying to mentally keep lists of tasks in your brain can make you more stressed and make it harder for you to concentrate on the task at hand? Writing down tasks on a paper to-do list or in a to-do list app can make you feel more relaxed, it can make your list seem more achievable, and it can ensure that things actually get done, so you aren't scrambling to finish an assignment minutes before it is due.  5. Eat Healthy Snacks While sweets are tempting, healthy snacks containing fruits, vegetables, and protein are so much better for your body (and for your mind, too)! Eating a balanced diet can give you the nourishment you need to work hard. For dozens of awesome snack ideas, make sure to check out our “Healthy(ish) Snacks” Pinterest board here! 6. Make Physical Space Cluttered bedrooms aren’t fun. They can stress your brain and make it more difficult to find what you need (and you might feel these effects more severely if you are already stressed). While this does take extra time out of your day, consider trying our 7-day declutter challenge. It helps free up physical - and mental - space so that you can truly breathe! 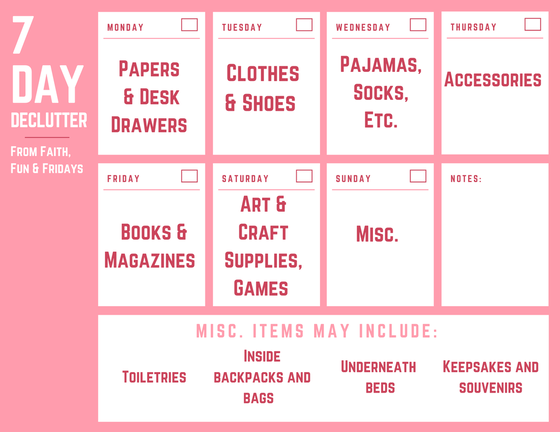 7. Look for Reasons to be Joyful If you are in the middle of chaos or hardship, you probably don't feel much like finding joy. However, it is super important - especially when you’re going through something difficult. Every night before bed, you could try writing down something good that happened that day in a journal or joy jar. Being grateful is a great way to combat fear, anger, and comparison! 8. Stretch/Exercise Even if you aren’t an exercise master, your body and brain still love exercise! No time for a long workout? No problem! Try a 3-5 minute series of stretches and deep breaths before a test or when you are feeling stressed. Tension eliminated!  9. Breathe You’ve probably heard it all your life, but it really is true: deep breathing has been rumoured to relieve stress and anxiety and increase energy. They are INCREDIBLE for your body and mind (it’s like a mini vacation)! Try concentrating on taking 5 or 10 slow, deep breaths in a row. Maybe you could even set a reminder on your device to remind you to take a series of breaths 3-5 times a day! 10. Music! I absolutely love worship music. From hymns to energetic praise songs, I find that listening to (and singing!) God-glorifying tunes can turn my mood around and give me the fresh perspective I need. The next time you feel stressed, try turning on some great music and watch the transformation happen!  11. Vacation! Take a mini-vacation through photos! Whether you have a favorite vacay destination (um, beach please!) or just love beautiful scenery, looking at relaxing images may just help relax you! Try creating a vision board with photos from magazines, or (with parent permission) set up a Pinterest board to collect those ideas 12. Pray Praying is the most powerful thing any Christian can do, in any circumstance! When you feel overwhelmed with life, pray and ask God for help. Even if you don't feel like he responds to you, he truly does hear your prayers!  13. Make Changes
Lastly, if you still feel overwhelmed, consider talking with your parents about what you can cut back or change. Maybe it's time to create a new daily schedule, to adjust your responsibilities, or to choose to cut back on some activities you're involved in. Make sure to discuss any concerns you have with your mom and/or dad so that you can live a balanced and healthy life! Thanks for reading! Love, A
1 Comment
 During these challenging times it can be really hard to connect with friends and family. You are probably already chatting with your pals through some sort of platform, such as FaceTime, Skype, Zoom, Marco Polo, WhatsApp, or even through letters, but it doesn’t feel the same as being with people in person. While my suggestions will not replace hanging with your besties, it might make your connecting a little extra fun. 1. Play chess through a text You may be thinking “And how do you suppose I go about that? Last I checked, I cannot reach through this phone.” Yes, I do know that technology does not work that way. You truly can play chess through a text! To start, tell the person you want to play chess with about this awesome blog (faithfunandfridays.com) and tell them to check out this post to read the “How to” for themselves. Then, each of you set up you chess board. Agree on who will start and have that person make their first move, then send a picture of their move to the other person. The other person will then move a piece on their board the same way the first person moved their piece, make their own move, and send the first person a pic. Then the first person moves a piece on their board the same as the other person’s piece, make their on move, take a picture.........and so on and so forth until someone wins! Note: Don’t have a chessboard or your friend doesn’t? Try playing Checkers, Sorry, Connect 4, Candy Land, or even Monopoly with the same process.  2. Um......what?
Have you ever seen someone try to read someone else’s lips? Or have you tried to read someone else’s lips? It never turns out right. Unless someone is really good at reading lips or has asked for a million hints, the lip-reading-attempter (please comment below if you that’s a legitimate thing, lol) usually has a hard time telling what the other person is mouthing. Send your friends a video of you “saying” something without any sound and let them guess what you are trying to say. Be prepared to laugh! 3. Mystery Letters Next time you write to your friends, try sending it in a baffling code. See if your friends are witty enough to crack your crazy code creation. Try writing in the following codes: Wingdings, Pig Latin, Cesar Cypher, and maybe your own made-up code! I hope you have fun with these ideas. Comment below with creative ways you are connecting with your friends! -B 5/1/2020 0 Comments May 01st, 2020***This project requires basic handsewing skills.*** Since the weather is warming up for spring, many of us are spending more time outdoors. I love to be outside, and I find that I get lots of great ideas for creative ideas when I am out of doors. However, I think that taking supplies to write down my ideas or work on creative projects is exhausting. Pens blow away in the wind, paper flies off your lap, etc. That's why I dreamed up this fun project - it's a pen/pencil holder that wraps around a clipboard and keeps your writing utensil in place. Are you ready to make your own? Let's get started! There are a lot of steps, but once you get started, it is a decently easy project. :) What You Will Need: - A strip of felt that is 28.75 inches long and 2 inches wide - Strong Glue (I used Tacky Glue) - Needle & Thread - Elastic (any width) - Measuring tape or yardstick 1. Cut our your strip of felt, if you haven't already. 2. Measure from the bottom of the strip to 4 inches up, and use a pencil to mark that spot. 3. Fold over the bottom of the felt until it reaches the four-inches line you had marked. 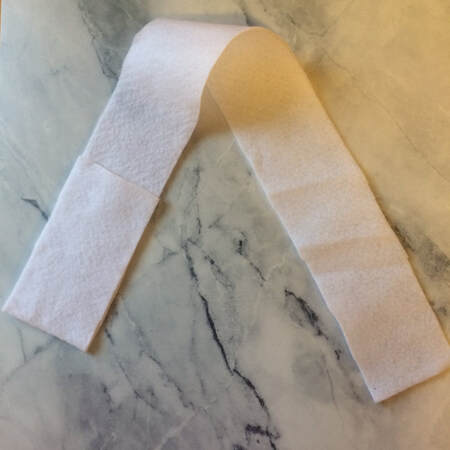 4. Place a line of glue along the edges of the bottom and both sides of your folded-over section. 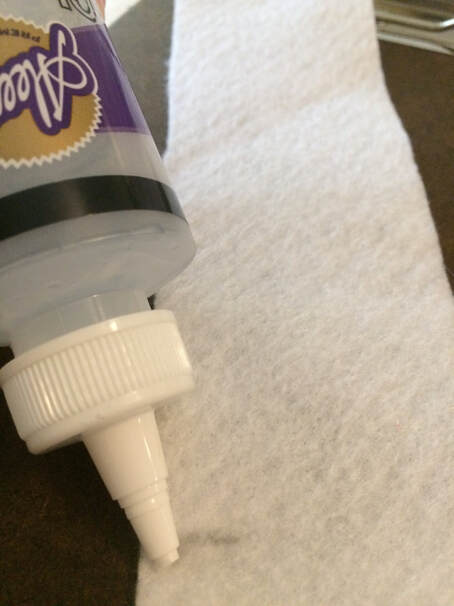 5. Let dry (this may take several hours). 6. Now, take your piece of elastic, and begin to hand-sew it onto the bottom of your felt strip. The felt may wiggle around for a while at first, and that's perfectly ok. You may try stitching in a bit of a "square" pattern, so that all of stitches form a square-like shape on the elastic. 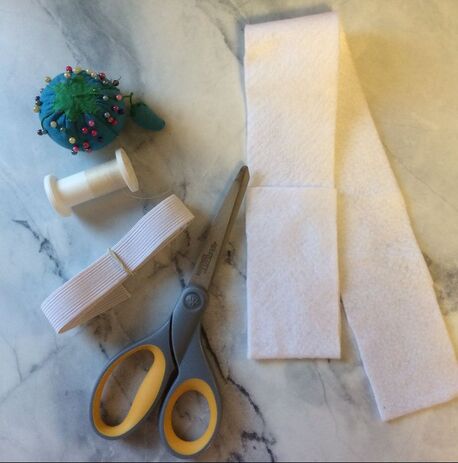 7. Sew the elastic onto the other end of the felt. Before you begin stitching, slip your partially-finished holder over a clipboard. Examine how well it will fit on the clipboard, and evaluate how tight the elastic will need to be. Since clipboards can vary a bit in size, I didn't provide measurements for the elastic. 8. Put in some pens and take your new creation outside! 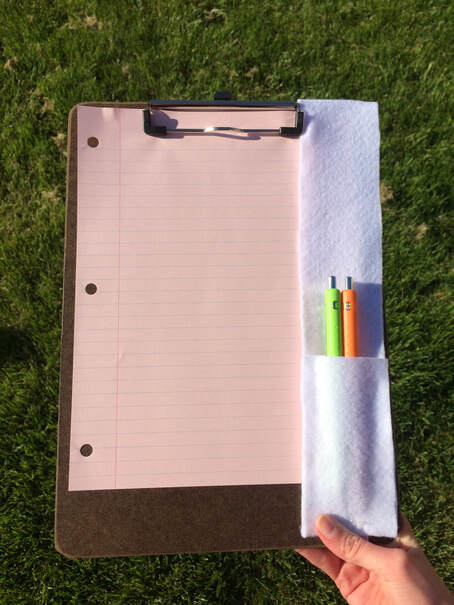 Thank you so much for following along with me!
Love, A 4/24/2020 0 Comments Scrap-Craft Scavenger Hunt With so many of us at home, it can be hard to get craft supplies you need. Fortunately, there are several replacements you can use to replace craft supplies you might need. Check out this handy chart to show you what to use to replace what.
Now for the scavenger hunt part. Try scrolling through the crafts on this blog and look for replacements for the supplies we used on that craft. Comment on this post to tell us what you found.  Looking for somewhere to start? You can find all of our crafts and activities posts here. Happy Hunting!
B Hello girls! Welcome back to our blog! Most families are spending a lot of time at home together right now. While that can be fun at first, after a few days/weeks/months, it can start to get boring. We have a great solution for ending boredom.....try to complete this new challenge that B and I are giving you! Are you ready to find out what the challenge is? The Challenge: - You have been tasked with making a fun, unique card game that you can play with your family while at home! You can only use the supplies listed below. The Supplies You can Use: - Plain Paper/cardstock - Notebook paper - Colored paper/cardstock - Markers/crayons/pencils/colored pencils - Scissors - Glue  What to Do: Step 1. Using the notebook paper, outline the rules of your new game. How many cards will there be? What will be on them? How many cards will each player get? What is the object of the game? Keep explaining and revising until you have an answer to all of these questions (and any more you come up with). Feel free to mix and match your favorite elements from a bunch of card games to come up with a new combination. While you're at it, come up with a fun name for your game, too! Example: My new card game is called Shuffle. Shuffle will have fifty cards, and each person will be dealt 4 cards to start. There will be five styles of cards: Red, Yellow, Blue, Green, and Unicorn (can be any color you want). The goal of the game is for someone to end up with four matching cards, and that person will win. To start the game, someone will pick up 2 cards from the "draw" pile and add them to their "hand" (set of cards). Then, they will pick one card from their hand that they don't want and they will pass it to the player on their right. The player on the right adds it to their hand, draws a card, and then passes two cards to the right, and so on until someone has a hand with four cards that all match.  Step 2. Now, design it! SInce we know how to play the game, it's now time to figure out what our cards will look like. Are they going to have solid-color backs? Will they be white with the logo of your game drawn on? You decide! Example: Shuffle's cards are going to have white backs with an "s" on the front. The part of the card that faces you will have a colored dot indicating whether that card is red, yellow, blue, green, or unicorn. Step 3. Make them! Using your assigned supplies, start crafting the cards for your new game! While you're at it, you might consider decorating a cute box or container to put them in, too. Example: I think that I will store Shuffle's cards in a zip-top bag. I will write on the bag first, so that I know what should be stored in it and how many cards I should have.  Step 4. Start playing! Call your family over to the table and announce your brand-new card game. Don't forget to explain the rules thouroughly.
Example: My family likes to play games in the evening, so we can try out Shuffle then. I'll make up copies of my game's rules and give them to my family members before we play. I'll also take the first turn, so that I can demonstrate what I do. I hope that you enjoyed this fun challenge! I am very excited to hear all about what game you created in the comments! Love, A 4/10/2020 0 Comments E.N.C.O.U.R.A.G.E. Pom- Pom BannerHey girls! Have you heard about our new E.N.C.O.U.R.A.G.E. video series for moms and daughters? If you haven’t, you definitely want to check out our E.N.C.O.U.R.A.G.E. tab right away and then get back to this craft. Go on! Check it out. Did you read about the video series? Awesome, right?! One really cool tool we are offering with every video is a free printable with the theme Bible verse for that video. It is a great thing to use because it will remind you of some great times and awesome Bible verses to always cherish. You can put the printables wherever you like, or you can make this adorable banner to hang them on! Let's get started. Supplies you need: * Yarn (2 colors) * Scissors * Little clothes pins * Needle 1. To make your pom -poms, wrap your yarn around 4 fingers 25-30 times. Cut the yarn on your hand off of the rest and leave a tail of about 4 inches. Remove your fingers from the yarn loops. Tie the tail around the wound yarn very tightly. 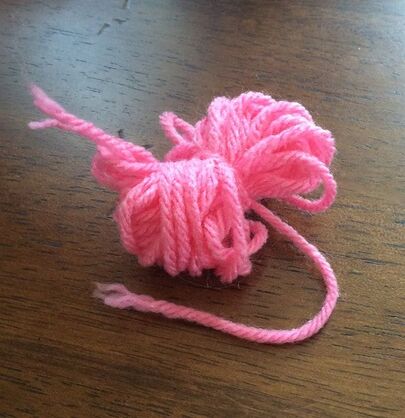 2. Cut the loops on your yarn and fluff it out. If you have any yarn strands that are significantly longer than the others, feel free to cut it shorter, but not too short! 3. Repeat steps 1-2 four more times with the same color and then use the same process to create five pom-poms in another color. You should have 10 pom-poms in total. 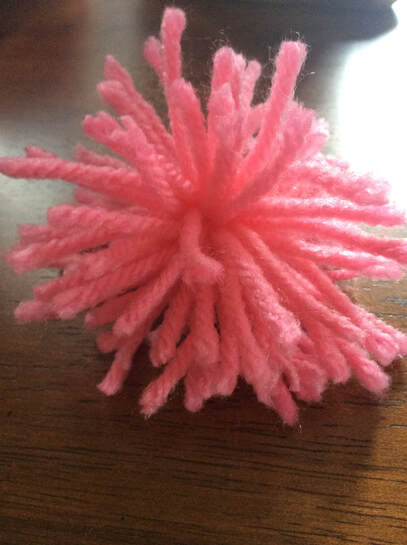 4. Lay your pom-poms out with about a 5-6 inch space between each. Run a piece of yarn along the length of your pom-poms and add an additional 2 feet. Cut that piece off. 5. Thread the long piece onto a needle and thread the pom-poms on. Space them 5-6 inches apart again and leave a foot hanging off each end. 6. Attach your clothespins in between your pom-poms and you are done! 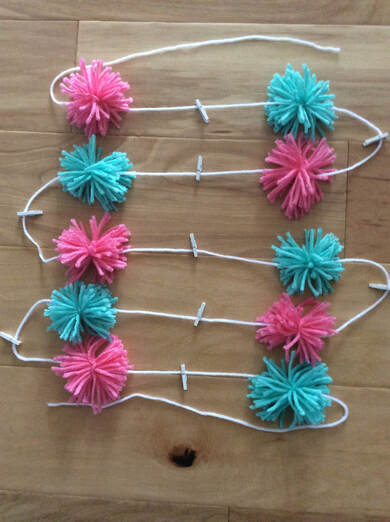 Great job!
-B 4/3/2020 0 Comments Make a Beach miniature SceneI love beaches. The sand beneath your toes, the waves rolling gently into shore. Ahh! It is so relaxing. So, if you would you love a break from the real world today, then make this adorable miniature beach scene for your bedroom. Hopefully, the view will transport you to your favorite beach! Are you ready to make it? Let's get started! What you need: * A deep white plate * Sand * Seashells * Blue glass gems * Dollhouse or fairy gardening bench or chair (you can find these at many garden centers and craft stores) How to Make it: 1. Start by filling your plate up most of the way with your sand. Tip: I did this with my plate on a plastic tray, so that if any sand spilled, it didn't end up all. over. the. house. :) 2. Then, use seashells to create a path in the sand and to create borders for the "water". (You may notice in this photo I had a different chair then in the rest. About halfway through, I decided to change it out for something a bit bigger.) 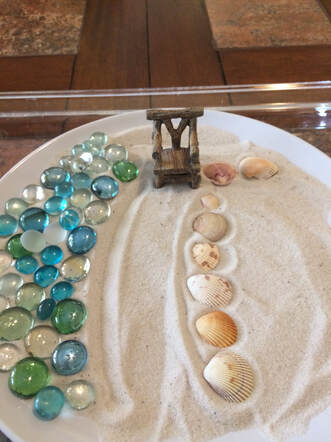 3. Fill in your "water" areas with glass gems. They should almost completely cover the sand in those areas. 4. Place your miniature bench or chair at the top of your path.. 5. Find a beautiful place to set your new, tiny vacation-destination! Who knew a trip to the beach could be so easy? 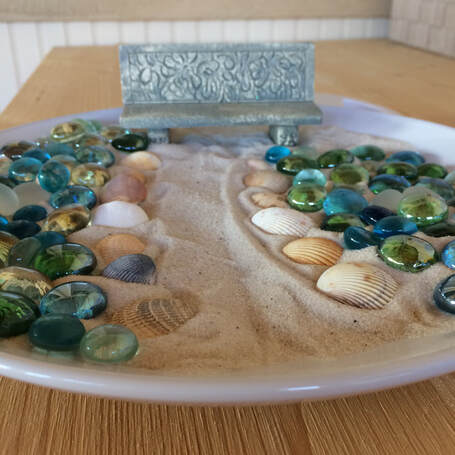 Sea you soon,
A 3/27/2020 0 Comments Make a Colossians 3:2 MagnetWhenever I am missing out on something I have a tendency to think about whatever or whoever I am missing. According to Colossians 3:2 we are supposed to keep our thoughts on God by: “Set your affections on things above, not on things on the earth. Colossians 3:2”. I am now going to show you how to make an adorable magnet to remind you of that. Supplies you need: * Thin/small wood rectangle * Acrylic paint (white and light blue) * Scrapbook pen * Sponge brush * Bristle brush * Stick-on magnet * Paper plate Note: Before you pour your paint, close the lid tightly and shake the bottle well. I forgot to do that with my white paint and it ran everywhere on my plate. 1. Pour your paint on your paper plate. You will not need very much. 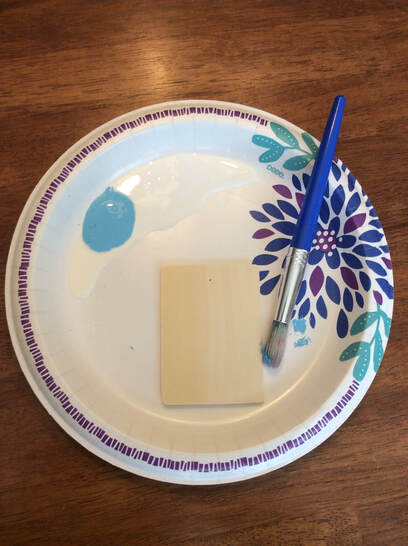 2. Paint your wood piece light blue with your bristle brush. A thin coat should be enough but you can apply a second layer if you would like. 3. Add a very little drop of light blue paint to your white paint. Do not add a lot. You white paint should only be slightly discolored after you stir in the blue drop. Allow the blue on your wood piece to be mostly dry before you continue. 4. Put a little of your white/blue mixture on your sponge brush. Push your brush against the side of your plate to remove all access paint. Lightly dab your sponge brush in two corners of your wood piece to create “clouds”. 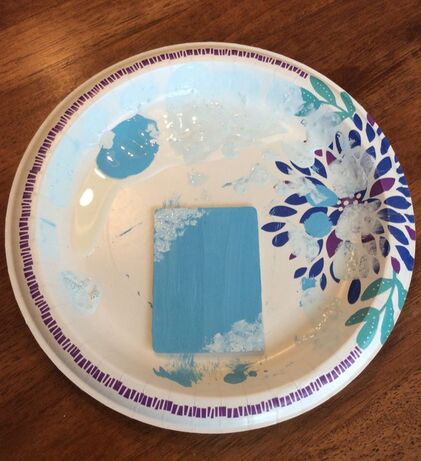 5. Write “Colossians 3:2 Set your affections on things above” in the in the center and let it dry completely. 6. Add a magnet to the back and ta-da! You are done. 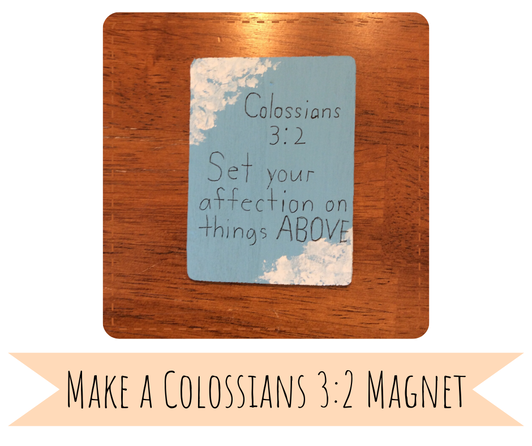 Hang your magnet on your refrigerator or magnet board. You are done!
Happy crafting! -B  1. Read a Book! We LOVE to read! Reading a book can transport you to another world. We have shared tons of great titles in our book reviews category and in our post on 20 of the best historical fiction books! 2. Do Some Pinteresting! If you have parent permission to be on Pinterest, then we would totally recommend checking out our "Our Favorite Crafts" board for some great inspiration! You may find just the ideas you need to start crafting.  3. Take a Walk Seriously, almost nothing is better for your body and your mind then getting some exercise and spending time outdoors! 4. Play a Board Game Both of us love to play board games with our family! Some of our favorites are are Monopoly, Settlers of Catan, Ticket to Ride, Dominoes (not technically a board game) and Clue.  5. Start an Online Bible Study Starting a weekly Bible study via Facetime or Skype can be a fun way to connect with girls and God at the same time! We have personallly done Ms. Lisa-Jo Baker's teen study We Saved You a Seat together and really enjoyed the conversations that came from it! 6. Make Bookmarks Whether for your Bible, school books or fiction books, it seems like there are never enough bookmarks to go around! You can remedy that situation by making one (or all) of these three easy bookmark DIYs!  7. Become a Pen Pal While it seems like Pen Pals are for younger kids, writing letters and cards is for everyone! Consider writing fun, colorful notes (you can even include one of your DIY bookmarks from #6) and mailing them to your friends, grandparents, pastors, and healthcare workers during this time.  8. Make a Cheery Spring Wreath Brighten up your house or front porch by making a spring wreath! Bonus points for making two and dropping one off on your neighbor or grandparent's front porch. 9. Solve a Jigsaw Puzzle Jigsaw puzzles are a great way to challenge your mind! Make time (and table space!) to solve a jigsaw puzzle. A cute image on the puzzle is a plus!  10. Color a Picture Check out these intricate Clockwork Sparrow and Jewelled Moth coloring sheets from Ms. Katherine Woodfine's website (she's the author of the Sinclair's Mysteries series). Go to this link (with parent permission) and scroll until you reach the tab titled "Drawing, Colouring, and Resources" and then click on the page you want to print. 11. Videocall a Friend or Family Member Take a break from texting to videocall or phone call a relative or friend! It can be refreshing to see their face and have a real conversation. 12. Make a Joy Jar Make a Joy Jar to write down the things that bring you joy each day. In times like this, it can be very helpful to give thanks back to God and to focus on the positive instead of the negative. 13. Clean/Reorganize Your Bedroom Is your bedroom in need of a facelift? It might be time to do things like a spring cleaning or a dresser cleanout! Make sure to check our "Room Redos" category for tons of fun and easy bedroom ideas. 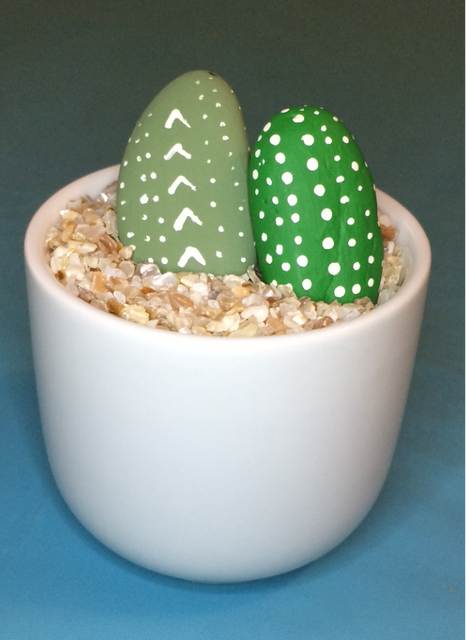 14. Make Cacti Rocks These cute cacti rocks are super easy to make and should bring a smile to your face! They are an awesome way to dress up your desk or headboard. 15. Learn About Colors Crazy about colors? Then read this quick, interesting post to find out more about colors and how to best use them in your bedroom (or bracelet, or coloring page...)!  16. Spend Time With Your Pets
Whether you have a cat, dog, fish, guinea pig, or kangaroo, most pets love to spend time with you! Make extra time to cuddle with your cat or dog, to play with your fish, or to feed them a special treat! Make sure to follow the guidance of your veterinarian or pet store so that you do not accidentally harm your friend. 17. Read Scripture Learn more about God and be encouraged and refreshed by reading our weekly verse of the week and the accompanying short devotions! 18. Learn Something New Try learning something new, like American Sign Language or how to play a musical instrument! You can find many great resources online (with the permission of your parents). Thank you for reading! With love, A&B 3/13/2020 0 Comments Make your own spring wreathI love wreaths! They are like beautiful rings that add a little bit of delight to one’s day. I am now going to show you how to make a springtime wreath for your room, front door, or to give as a gift. Supplies you need: * A plain twig wreath * Faux flowers (a variety) * Ribbons, fake butterflies, other decals, etc. * Floral wire * Wire cutters 1. Play with your flowers. Try arranging them in different ways on your wreath. You can even cut flower clusters apart to spread them out. Choose your favorite layout and read on! 2. Attached your combo of choice with floral wire. Add a bow at the base of your flowers. 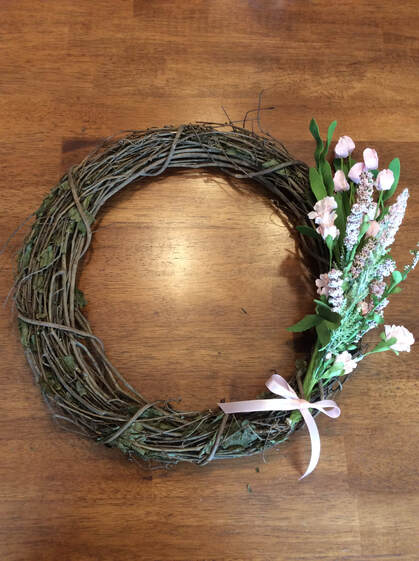 3. Add another attachment of your choice then make a loop on the back to hang it by. Ta-da! You’ve made a wreath. 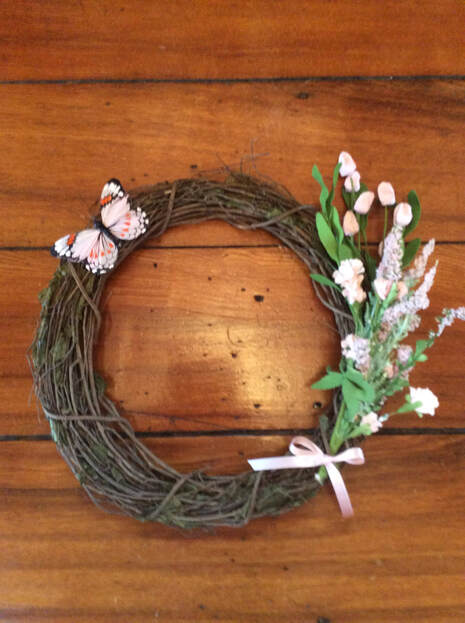 Good job!
-B |
Search by typing & pressing enter
